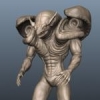
Advanced Member Sandro Borg Posted January 3, 2012 Advanced Member Report Share Posted January 3, 2012 Hi everybody. Happy New Year all! Here's a personal project I've been working on the last few days,the Vamore from Guyver (anime/manga series). Completely sculpted in 3DCoat using voxels/surfacemode/liveclay.Model is currently approx 3 million polygons. I want to move on to retopo soon,I'm just seeing how far in detail I can go in sculpt mode. Comments and feedback welcome. 1 Quote Link to comment Share on other sites More sharing options...
Reputable Contributor digman Posted January 3, 2012 Reputable Contributor Report Share Posted January 3, 2012 Very nice work, I will leave the critiques to the more experienced. LC is is coming along nicely... 1 Quote Link to comment Share on other sites More sharing options...
Advanced Member michalis Posted January 3, 2012 Advanced Member Report Share Posted January 3, 2012 A very clean sculpting sandro. Well done. I'm also leaving the crits to more experienced on this subject. 1 Quote Link to comment Share on other sites More sharing options...
Contributor LJB Posted January 3, 2012 Contributor Report Share Posted January 3, 2012 Good job Sandro Its nice and clean as others have said. Good work, pose a bit rigid, But i seem to remember the it was a bit like that in the Guyver (Forgive only limited Knowledge of the monster) Still Coolio stuff! 1 Quote Link to comment Share on other sites More sharing options...
Advanced Member Sandro Borg Posted January 7, 2012 Author Advanced Member Report Share Posted January 7, 2012 Thank you for your comments guys,much appreciated. LiveClay is making a huge difference in what I feel I can acheive with this program. It is very stable in it's current build,I'm excited to see how it develops. Most of my sculpting is done in surface mode,especially rapid2 tool,gradually increasing resolution by using resample,then finish off finer details using liveclay tools @LJB , yes I agree about the pose. I worked very closely to the original reference pics and model. I intended to rig this character,so I wanted a fairly neutral pose. However,I've just upgraded to Rhiggit Pro for Lightwave,which allows you to set up the rig in any position,not just the standard T pose,which will be very useful,so I'll be trying that out soon. I've just created a retopo mesh for this model,but I'm having trouble getting it into microvertex as you can see from the screengrabs.NormalMap mode works absolutely fine. Very frustrating. I must be doing something wrong,though I haven't come across this problem in ages. If anyone can shed any light on this... Anyway,back to work. Thank you all again for your encouragement. Quote Link to comment Share on other sites More sharing options...
Reputable Contributor digman Posted January 7, 2012 Reputable Contributor Report Share Posted January 7, 2012 EDIT: Nice edge flow to your retopo mesh. It is possible that you have a few interior holes or intersections in your surface mesh which I believe can cause problems in baking. Fill voids will not work as you have to go back to voxels to use it. Run close holes first and then remove intersections under the voxel menu. I found that remove intersections under the voxel menu will also remove interior holes in surface mode. It's worth a try but as always save a backup copy before testing. It's takes a little while to fill the holes. Plus if you do have a few intersections in the of mesh it will get rid of those too. Andrew stated not long ago that Normal Maps are alot more forgiving in baking and displacement maps will revel some errors. If you can not find a solution, I would send the file to Andrew to look at as it could be a bug... Quote Link to comment Share on other sites More sharing options...
Advanced Member michalis Posted January 7, 2012 Advanced Member Report Share Posted January 7, 2012 Run close holes first and then remove intersections under the voxel menu.I found that remove intersections under the voxel menu will also remove interior holes in surface mode. It's worth a try but as always save a backup copy before testing. It's takes a little while to fill the holes. Plus if you do have a few intersections in the of mesh it will get rid of those too. Andrew stated not long ago that Normal Maps are alot more forgiving in baking and displacement maps will revel some errors. If you can not find a solution, I would send the file to Andrew to look at as it could be a bug... Is this right? It doesn't work David, not for MV mode. What is more forgiving and what is unpredictable, I can't tell. MV uses subdivisions and reprojections (shrink wrapping). It seems that this isn't working as expected. You know me, I tried everything. Under vox mode, under surf mode, close holes, fill voids, It was working on earlier builds... Quote Link to comment Share on other sites More sharing options...
Contributor LJB Posted January 7, 2012 Contributor Report Share Posted January 7, 2012 The answer is DONT USE MICROVERT. Use PTex with Smooth mesh checked. Then bake maps from the PTex to your lower topology Why Andrew cannot use this form of smoothing for Microvert? If it could then would save the step. Phil had these problem is one of his threads. here is the example I posted - its not a perfect solution but it removed 98% of the artifacting and allows you to paint without UV. here are the type of area where you may experience problems. Try it let me know. Quote Link to comment Share on other sites More sharing options...
Reputable Contributor digman Posted January 7, 2012 Reputable Contributor Report Share Posted January 7, 2012 The method of Ptex and texture baking tool use to work great but now I have been having trouble with the linux version of the texture baking tool but I am using the most recent beta version of 3DCoat. Quote Link to comment Share on other sites More sharing options...
Advanced Member Sandro Borg Posted January 8, 2012 Author Advanced Member Report Share Posted January 8, 2012 Thank you all for your suggestions - I tried them all,but to no avail. I figured it must be something to do with the voxel sculpt,reverted back to a previous version I'd saved,readjusted the retopo mesh and success! No more crazy stretching. We live and learn. I will keep all your suggestions and comments in mind in future should these issues arise again. Cheers. Quote Link to comment Share on other sites More sharing options...
Advanced Member Sandro Borg Posted January 8, 2012 Author Advanced Member Report Share Posted January 8, 2012 Here's a screengrab from Layout with the VPR preview render,just to check that everythings ok. I'm quite happy with that,so time to move on... Quote Link to comment Share on other sites More sharing options...
Advanced Member Sandro Borg Posted January 8, 2012 Author Advanced Member Report Share Posted January 8, 2012 A quick update. I retopologised the shoulder Pods,and successfully merged both pieces into MicroVertex along with the body,in seperate layers. Time to add UVs. A question. I usually merge first,creating automatic Uv,then once merge I clear these and then create my own UVs Is this right? Or should I create UV first and then merge into MicroVertex? Thanks in advance. Quote Link to comment Share on other sites More sharing options...
Advanced Member Sandro Borg Posted January 8, 2012 Author Advanced Member Report Share Posted January 8, 2012 Last update for this evening. A quick Lightwave VPR to check everything's fine. I plan to start UV first thing tomorrow,then on with the painting/texturing/detailing. Quote Link to comment Share on other sites More sharing options...
Advanced Member Sandro Borg Posted January 8, 2012 Author Advanced Member Report Share Posted January 8, 2012 UV mapping completed. I reverted back to an earlier version and tried UV mapping before mergeing to microvertex.Unfortunately it gave me way to many surface errors to deal with ,so I've gone back to my method of automatic retopo while merging into MV,then manually clean up the UVs. I'm sure this is mostly to do with my inexperience of UV mapping and how 3DCoat's UV mapping tools work. I'll have to spend some more time studying this area,but for the time being,this will suffice. Quote Link to comment Share on other sites More sharing options...
Advanced Member Sandro Borg Posted January 9, 2012 Author Advanced Member Report Share Posted January 9, 2012 Almost done painting/texturing. I'll post up some renders when I'm finished. Quote Link to comment Share on other sites More sharing options...
Reputable Contributor digman Posted January 9, 2012 Reputable Contributor Report Share Posted January 9, 2012 Coming along great, looking forward to the renders. Quote Link to comment Share on other sites More sharing options...
Reputable Contributor AbnRanger Posted January 9, 2012 Reputable Contributor Report Share Posted January 9, 2012 The answer is DONT USE MICROVERT. Use PTex with Smooth mesh checked. Then bake maps from the PTex to your lower topology Why Andrew cannot use this form of smoothing for Microvert? If it could then would save the step. Phil had these problem is one of his threads. here is the example I posted - its not a perfect solution but it removed 98% of the artifacting and allows you to paint without UV. here are the type of area where you may experience problems. Try it let me know. Indeed. I have NEVER gotten anything workable from MV mode. That's why I usually just give the mesh a medium high resolution and merge to PPP, where the baking is usually right on. Quote Link to comment Share on other sites More sharing options...
Advanced Member Sandro Borg Posted January 9, 2012 Author Advanced Member Report Share Posted January 9, 2012 LJB, AbnRanger - thanks for the tip,I'll have to try it out. However,is it possible to save the mesh out at the original low resolution when mergeing to PTEX? It always ended up subdividing the low res mesh. Low res mesh is important to me as I do characters for animating in Lightwave. This is the problem I had initally,and why I've since stuck to Mircrovertex. I agree that PPP is straightforward to use,but it doesn't quite give me the results I'm after,ie displacements. I've used MV on a lot of models,none quite as detailed as this one,and never really had any problems. But still,Ii'm prepared to give PTEX a go if I can get a workable workflow between Lightwave,and not having to deal with UV's is definately a plus. Cheers. Quote Link to comment Share on other sites More sharing options...
Contributor LJB Posted January 9, 2012 Contributor Report Share Posted January 9, 2012 Hi Sandro one word of advice for future ref, Joints like Knees, Elbows and Knuckles could always do with a little more geometry on the Out edge to help maintain the volume at full bend. Excuse the crude paint over example, but it serves the purpose here. hope this helps. 1 Quote Link to comment Share on other sites More sharing options...
Contributor LJB Posted January 9, 2012 Contributor Report Share Posted January 9, 2012 Great job on texture BTW! keep going, Maybe use the move tool on the face geo to Evil him up a little like on the ref. Quote Link to comment Share on other sites More sharing options...
Advanced Member Sandro Borg Posted January 9, 2012 Author Advanced Member Report Share Posted January 9, 2012 Cheers Leigh, Good tip regarding retopo joints - I will definately bear that in mind next time on the next model I retopo. I am in the sculpt room now reshaping his head - he will definately be more evil next time you see him! Thank you for your input. MUCH appreciated. Quote Link to comment Share on other sites More sharing options...
Advanced Member Sandro Borg Posted January 10, 2012 Author Advanced Member Report Share Posted January 10, 2012 Some quick renders showing various views. Quote Link to comment Share on other sites More sharing options...
Reputable Contributor digman Posted January 11, 2012 Reputable Contributor Report Share Posted January 11, 2012 Ah, it will be good to see him come alive when you are done rigging him... Quote Link to comment Share on other sites More sharing options...
Advanced Member Sandro Borg Posted January 11, 2012 Author Advanced Member Report Share Posted January 11, 2012 Funny you should mention that digman,cos that's exactly what I've been thinking about this evening. I think I've gone as far as I can for now with this model in it's present incarnation. I need to redo parts of the retopo mesh too,there are some (hidden) errors and as Leigh pointed out,the joints could be optimised for animation. The UVs also need reworking,I've learnt lots during the course of this project (especially with the feedback from you guys),so this area could also be optimised. I need to use higher resolution maps.I'd really like to go to town on the detail when viewed up close.The current ones are far too low resolution, can't get much more detail out of them. Also,I want to experiment with the different options for merging , PTEX, PPP as well as Microvertex to see what works best,after looking at all your methods I'm willing to give them a try. Anyway,time to load him into Lightwave. I upgraded to Rhiggit Pro this xmas and I haven't had a chance to use it yet,so this would be perfect oppertunity to do so. If the rigging goes well,I can simply replace this older model with the reworked one. 1 Quote Link to comment Share on other sites More sharing options...
Taros Posted January 11, 2012 Report Share Posted January 11, 2012 Very nice and good work. Quote Link to comment Share on other sites More sharing options...

Recommended Posts
Join the conversation
You can post now and register later. If you have an account, sign in now to post with your account.
Note: Your post will require moderator approval before it will be visible.